85 lines
4.4 KiB
Markdown
85 lines
4.4 KiB
Markdown
<h1 align="center">Algolia 搜索</h1>
|
||
|
||
NexT 内部提供 Algolia 的搜索功能,要使用此功能请确保所使用的 NexT 版本在 `v5.1.0` 之后。需要注意的是,仅仅将 `next/_config.yml` 中 `algolia_search` 的 `enable` 打开**并不能让你使用 Algolia 搜索**,你还需要**使用对应的 Hexo-Algolia 插件** 才能真正在博客页面中使用 Algolia 搜索。按照下面介绍的步骤操作即可完成 Algolia 搜索的安装。
|
||
|
||
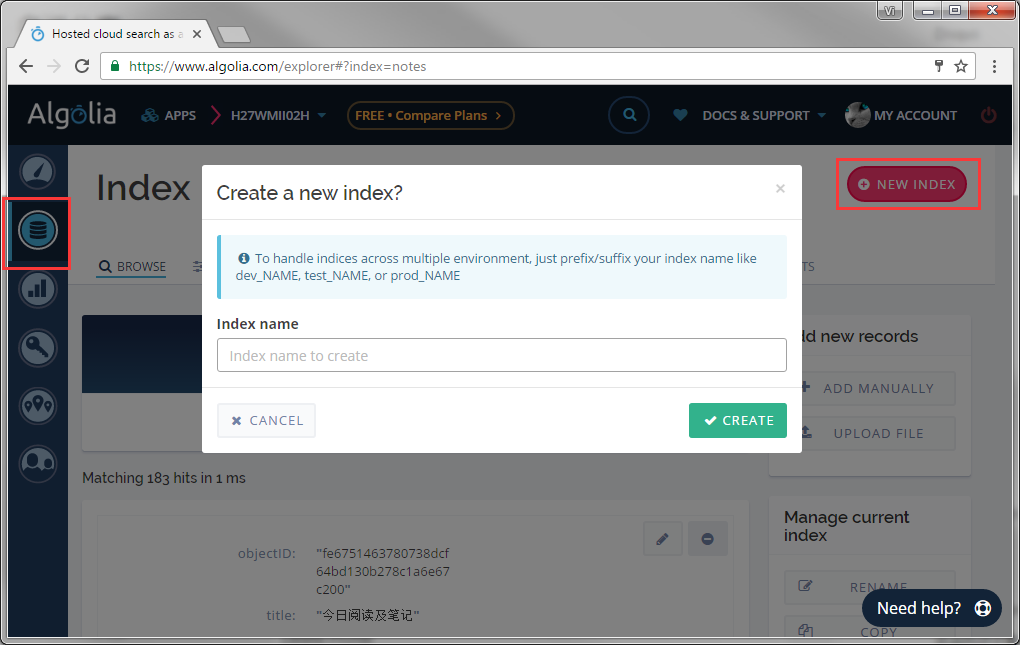
1. 前往 [Algolia 注册页面](https://www.algolia.com/),注册一个新账户。 可以使用 GitHub 或者 Google 账户直接登录,注册后的 14 天内拥有所有功能(包括收费类别的)。之后若未续费会自动降级为免费账户,免费账户 总共有 10,000 条记录,每月有 100,000 的可以操作数。注册完成后,创建一个新的 Index,这个 Index 将在后面使用。
|
||
|
||
|
||
|
||
1. Index 创建完成后,此时这个 Index 里未包含任何数据。接下来需要安装 [Hexo Algolia](https://github.com/oncletom/hexo-algolia) 扩展,这个扩展的功能是搜集站点的内容并通过 API 发送给 Algolia。前往站点根目录,执行命令安装:
|
||
|
||
```
|
||
$ cd hexo
|
||
$ npm install --save hexo-algolia
|
||
```
|
||
|
||
1. 在 `API Keys` 页面找到需要使用的一些配置的值,包括 `ApplicationID` 和 `Search-Only API Key`。注意,`Admin API Key` 需要保密保存,不要外泄。
|
||
|
||

|
||
|
||
1. 在 `API Keys` 页面,点击 `ALL API KEYS` 找到新建 INDEX 对应的 key,**编辑权限**,在弹出框中找到 ACL ,**勾选 Add records、 Delete records、List indices、Delete index 权限**,点击 `update` 更新。
|
||
|
||

|
||

|
||
|
||
1. 编辑 `站点配置文件`,新增以下配置,除了 `chunkSize` 字段,替换成在 Algolia 获取到的值:
|
||
|
||
```yml
|
||
algolia:
|
||
applicationID: 'applicationID'
|
||
apiKey: 'apiKey'
|
||
indexName: 'indexName'
|
||
chunkSize: 5000
|
||
```
|
||
|
||
1. 当配置完成,在站点根目录下执行一下命令来更新上传 Index。请注意观察命令的输出。
|
||
|
||
```
|
||
$ export HEXO_ALGOLIA_INDEXING_KEY=Search-Only API key # 使用 Git Bash
|
||
# set HEXO_ALGOLIA_INDEXING_KEY=Search-Only API key # 使用 Windows CMD 命令行
|
||
$ hexo clean
|
||
$ hexo algolia
|
||
```
|
||
|
||

|
||
|
||
1. 切换到 NexT 目录,并安装 algolia-instant-search 到 `source/lib` 目录。
|
||
|
||
```
|
||
$ cd themes/next
|
||
$ git clone https://github.com/theme-next/theme-next-algolia-instant-search source/lib/algolia-instant-search
|
||
```
|
||
|
||
如果你想直接使用 CDN 设置 Algolia Search,则需要在`主题配置文件`中添加 vendors 字段:
|
||
|
||
```yml
|
||
vendors:
|
||
...
|
||
# Internal version: 1
|
||
# https://www.algolia.com
|
||
algolia_instant_js: https://cdn.jsdelivr.net/npm/instantsearch.js@2.4.1/dist/instantsearch.js
|
||
algolia_instant_css: https://cdn.jsdelivr.net/npm/instantsearch.js@2.4.1/dist/instantsearch.min.css
|
||
...
|
||
```
|
||
|
||
1. 更改`主题配置文件`,找到 Algolia Search 配置部分,将 `enable` 改为 `true`。同时你需要**关闭**其他搜索插件,如 Local Search 等。你也可以根据需要调整 `labels` 中的文本:
|
||
|
||
```yml
|
||
# Algolia Search
|
||
algolia_search:
|
||
enable: true
|
||
hits:
|
||
per_page: 10
|
||
labels:
|
||
input_placeholder: Search for Posts
|
||
hits_empty: "We didn't find any results for the search: ${query}"
|
||
hits_stats: "${hits} results found in ${time} ms"
|
||
```
|
||
|
||
<h2 align="center">已知的问题</h2>
|
||
|
||
1. 考虑到 Algolia 免费账户的限制,目前 [Hexo-Algolia](https://github.com/oncletom/hexo-algolia) 插件最新版本去掉了正文索引功能。
|
||
1. [Hexo-Algoliasearch](https://github.com/LouisBarranqueiro/hexo-algoliasearch) 插件提供了正文索引功能,不过需要替换 NEXT 主题中的关键字。对于免费账户,`Record Too Big` 的问题同样存在。
|
||
- 替换 `source/js/algolia-search.js` 中所有的 `applicationID` 为 `appId`
|
||
- 替换 `layout/_partials/head/head.swig` 中所有的 `applicationID` 为 `appId`
|